4. 一致性哈希
...大约 4 分钟
https://github.com/dreamjz/golang-notes/tree/main/books/7-days-golang/GeeCache/day4-consistent-hash
DAY4-CONSISTENT-HASH
│  go.mod
│  go.work
│  main.go
│
└─geecache
    │  byteview.go
    │  cache.go
    │  geecache.go
    │  geecache_test.go
    │  go.mod
    │  http.go
    │
    ├─consistenthash
    │      consistenthash.go
    │      consistenthash_test.go
    │
    └─lru
            lru.go
            lru_test.go
1. 一致性哈希(Consistent Hash)
1.1 为何需要一致性哈希
当一个节点收到请求,但是当前节点未存储缓存值,此时节点需要决定向哪一个节点发送请求:
- 若随机选取,那么下一次不一定能够再次选取到已经有缓存的节点,再次需要访问数据库,效率低下
- 若实现简单的哈希算法,例如将key的 ASCII 之和除以节点数的余数作为选择的节点编号。但是,当节点数量发生变化时,所有的缓存失效,引发缓存雪崩(缓存在同一时刻全部失效,造成瞬时DB请求量大、压力骤增,引起雪崩。常因为缓存服务器宕机,或缓存设置了相同的过期时间引起)
2. 一致性哈希算法
2.1 基本步骤
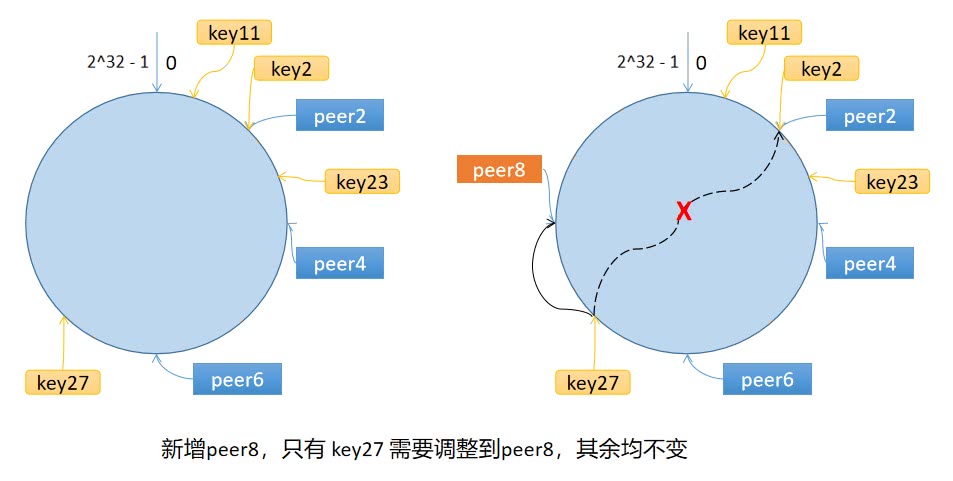
一致性哈希算法将 key 映射到 的空间中,将数组首位相连成环。
- 计算节点/机器(通常为节点名、编号、IP)的哈希值,放到环上
- 计算 key 的哈希值,放到环上,顺时针找到的第一个节点就是应该选取的节点/机器

如上图所示,当新增节点peer8时,只有key27的映射会发生改变。
所以,使用一致性哈希算法,只有在新增/删除节点时,会导致一小部分数据需要重新定位,不会导致所有的缓存失效从而引起缓存雪崩。
2.2 数据倾斜
若节点过少,容易导致数据倾斜。例如上图中,节点2,4,6均分布在环的一侧,导致大量数据被分配到peer2上,导致负载不均。
通过引入虚拟节点可以解决数据倾斜问题:
- 计算虚拟节点哈希值,放在环上
- 建立虚拟节点和真实节点的映射
- 计算key的哈希值,顺时针寻找虚拟节点,并映射到真实节点
虚拟节点扩充了节点数量,解决了数据倾斜问题,且代价较小,只需维护虚拟/真实节点映射即可。
2.3 实现
// Hash maps bytes to uint32
type Hash func(data []byte) uint32

// Map contains all hashed keys
type Map struct {
	hash     Hash
	replicas int
	keys     []int
	hashMap  map[int]string
}

func New(replicas int, fn Hash) *Map {
	m := &Map{
		replicas: replicas,
		hash:     fn,
		hashMap:  make(map[int]string),
	}
	if m.hash == nil {
		m.hash = crc32.ChecksumIEEE
	}
	return m
}
Map:一致性哈希算法主数据结构hash:哈希函数replicas:虚拟节点倍数keys:哈希环hashMap:虚拟/真实节点映射表,key 为虚拟节点哈希值,value 为真实节点名称
New:可定义节点倍数和哈希函数,默认哈希函数使用crc32.ChecksumIEEE// Add adds keys to the hash func (m *Map) Add(keys ...string) { for _, key := range keys { for i := 0; i < m.replicas; i++ { hash := int(m.hash([]byte(strconv.Itoa(i) + key))) m.keys = append(m.keys, hash) m.hashMap[hash] = key } } sort.Ints(m.keys) }Add:添加节点,可以传入多个真实节点名对于每个真实节点,创建
m.replicas个虚拟节点,虚拟节点按照strconv.Itoa(i) + key的形式编号计算虚拟节点的哈希值,并添加至虚拟/真实节点映射
哈希环上的数据按照升序排序
// Get gets the closest item in the hash to the provided key
func (m *Map) Get(key string) string {
	if len(m.keys) == 0 {
		return ""
	}

	hash := int(m.hash([]byte(key)))
	// Binary search for appropriate replica
	idx := sort.Search(len(m.keys), func(i int) bool {
		return m.keys[i] >= hash
	})

	return m.hashMap[m.keys[idx%len(m.keys)]]
}
- 计算key的哈希值
- 顺时针寻找匹配的虚拟节点,若索引为
len(keys),则选择keys[0],因为m.keys为环状结构所以使用模运算 - 通过
hashMap获取真实节点
3. 测试
func TestHash(t *testing.T) {
	hash := New(3, func(data []byte) uint32 {
		i, _ := strconv.Atoi(string(data))
		return uint32(i)
	})

	// Given the above hash function, this will give replicas with hashes:
	// 2, 4, 6, 12, 14, 16, 22, 24, 26
	hash.Add("6", "4", "2")

	tests := map[string]string{
		"2":  "2",
		"11": "2",
		"23": "4",
		"27": "2",
	}

	for k, v := range tests {
		if got := hash.Get(k); got != v {
			t.Errorf("Get(%q) = %v, want: %v", k, got, v)
		}
	}

	// 8, 18, 28
	hash.Add("8")
	tests["27"] = "8"

	for k, v := range tests {
		if got := hash.Get(k); got != v {
			t.Errorf("Get(%q) = %v, want: %v", k, got, v)
		}
	}
}
测试时使用了简单的哈希算法进行测试。
Reference
Powered by Waline v2.15.2
